Are you a new chair seat weaver? Getting into this seatweaving craft for either fun or profit?
Are you intimidated by weaving your first paper rush seat? If so, hopefully this post will be a big help to get you on the right track to conquer your fears.
Most likely, you are familiar with the traditional way of beginning the paper rush weaving process. But did you know there are at least four techniques you could use to set up the foundation before starting to weave the pattern?


This page might contain affiliate links. In the event of a sale, I will receive a small commission at no extra cost to you.
First things first though, you’ll need to take some pictures of the old seat, both from the top and the bottom.
Then, remove the seat using an upholstery tack lifter, utility knife, and a pair of scissors. Set the old seat aside in case you need to refer to it again for any reason.
Next, purchase your paper rush from the suppliers listed here on the Cane and Basket Supplies Directory™ and assemble all your tools and materials for the project .
.
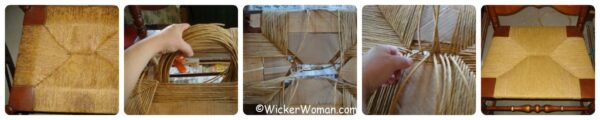
Alternate Ways of “Squaring Up” a Paper Rush Seat
#1. Standard beginning steps for weaving a paper rush seat:
- Measure the front rail and the back rail, marking the difference on the front rail
- Determine how many “short rows” you will need to add on the front rail to “square up” the seat
- Cut short lengths of paper rush to reach from side to side weaving around front corners
- Attach the strands, one at a time, to the left side rail with upholstery tacks

- Weave around the two front corners with each strand, starting on the left and ending on the right
- Attach the ends of the short rows to the right rail with tacks

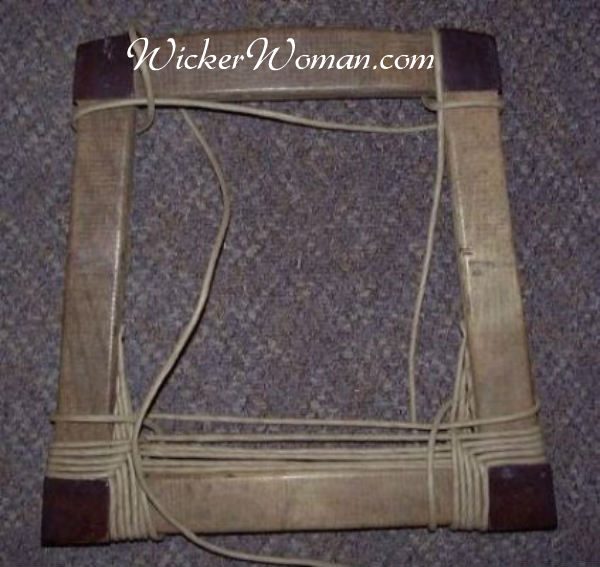
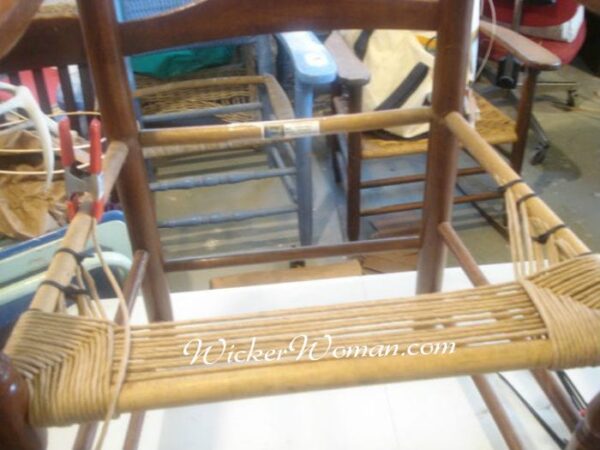
#2. Use cable ties to start and end the “short rows”:
Using only the cable ties to secure the ends of those short rows in the gussets, instead of pounding yet another upholstery tack into the side rails, really helps save the integrity of the wooden rails.
FURTHER READING: Paper Rush Seatweaving Hint–Tuesday Tips
Determine how many short rows you need to fill the space on the front rail that is the difference between the length of the front and back rails.
Double the length of the “short row” and then fold it in half. Secure all the strands at the fold with long cable ties wrapped around the rail.
Leave the tab or end on the inside of the seat and cut as short as possible. This is in the gusset and will be covered by the weaving. Then, on the ends, secure those to the right rail with cable ties also.
It’s obvious here I should have used clear or white cable ties, but in the end result, they didn’t show at all anyway. But to be safe the next time, I used clear cable ties.
#3. Using cable ties and spring clamps:
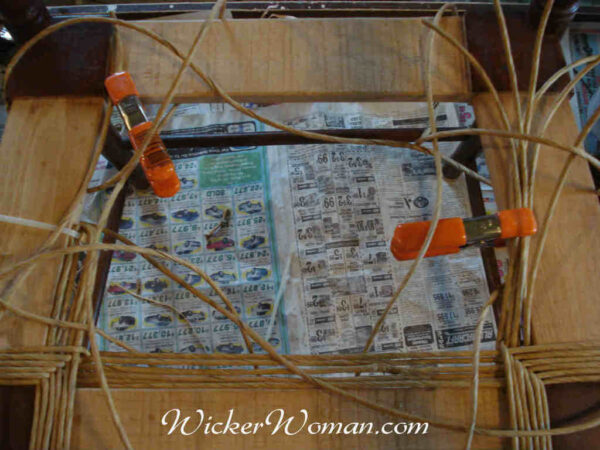
Why yes, it’s cable ties to the rescue! Hold all the doubled-up “short rows” on the left with one cable tie. Then when you get to the right side, hold the ends in place with a spring clamp .
.
After you weave around those corners a bit, then pull the spring clamp out and the weave will hold the end strands in place.
FURTHER READING: Paper Rush Seat Weaving Tip
#4. Other ways of starting to rush that seat???
Well, there are other ways to start rush seats that I’ll tell you about in future posts, so stay tuned for more!
Did you know there were so many ways to attach the “short rows” and square up a rush seat?
Let me know in the comments below, just how you attach the short rows to the side-rails.


I have a rectangliar seat. how do i weave it to square it up?
Guy, there’s no need to square up a rectangular seat, just weave as normal.There will be a larger/longer bridge in the middle however. With the trapezoidal shaped seats, which are wider in the front than they are in the back, you need to square those up first by weaving the short rows, gussets or front corners so you can then weave completely around all four corners because it’s squared up. Thanks for the question. Hope my answer helps!
I have an old family childs chair which has a seagrass seat, woven in the rush style, which needs replacing. Its only small about 9”. My first grandchild is on his way and I would like to restore for the fourth generation to use. I have never attempted anything like this before but would really like to try it. I was planning on doing it in paper rush but wonder if maybe I should use seagrass like it is at the moment. But then II thought if I use seagrass maybe I chould do it in the checkered pattern. There are so many options but which would you recommend for a complete beginner like me.
Hi there Beverley,
How wonderful that you have a family heirloom to work on, what a delightful project! Since you are brand new to seat weaving, I would suggest you try a simple way first and then if you decide to redo the seat after your skills have improved, you can do so.
First of all, working with seagrass can be challenging in that it’s hard on your hands and can scratch them up. Second, seagrass is slippery so when weaving the rush pattern, strands do not want to stay in their position and slip out of place. And third, seagrass woven in a checkerboard pattern is lovely and easy to weave when done on a perfect square or rectangle. Since most chairs and rocker seats are trapezoidal, wider in the front than in the back, this presents another set of problems concerning the sides. Best left to the more proficient weavers, not beginners.
So my suggestion for this child’s rocker is to weave it with paper fibre rush in the traditional rush (four triangles meeting their tips in the center) pattern. Take a look at my Cane & Basket Supplies Directory™ to buy the rush material and other supplies.
Also, check out the Seatweaving FAQ page for suggestions on what books to buy for your personal reference library which will help you for many, many years to come, especially if you decide to take up seatweaving as a vocation!
I have a few blog posts that might also help you, so go to the blog (tab at the top of every page) and search the Seatweaving category or the Paper Rush category and you’ll come up with several posts for the beginner as well as accomplished weavers. Happy Weaving!
I recently bought two children’s chairs with rush seats. The previous one had spray painted the Rush dark brown/almost black.
I’m going to clean and repaint the chair but am a loss what to do about the seats.
Well, Chris Ann, it seems to me that you have two choices with the little rush seats. Either reweave them or have it done if you don’t want to do the weaving yourself or you can leave the rush seats the way they are. Maybe you can paint the chairs a nice color that will blend with the seats or contrast with the seats nicely. And it’s too difficult and messy to try and strip the paint off the rush seats, believe me! Good luck, hope it all works out!
I have a rocker from Cracker Barrel that my cats have clawed the paper rushould to pieces. I’ve rewoven the seat by following video instruction. However, I cannot find any information on how to weave the back. I want it to look like the original but canot find a single instruction article. Can you help me!
Hi Greg,
I understand your predicament but it’s really not that much different to weave the back of the rocker as it is to weave the rush seat. Only thing is that the backs are perfect rectangles, unlike the seats which are trapezoidal, wider in the front than in the back. So with the rocker backs, there will not be any “short rows” and no “squaring up” that is necessary for the trapezoidal seats. It’s pretty well a straight, easy shot to weave the backs, very similar to weaving a square only much, much bigger weaving area!
You will need to make sure you have enough length with the paper rush coil you are weaving with to go around all four corners at least three or four times before you have to join strands. And make sure to secure your joins with new and old strands within the gussets so they don’t show at all. And if you MUST have a visible join, make sure it’s on the back of the rocker back, so it cannot be seen from the front.
Good luck and let me know how it all turns out! Happy Weaving!
Hi, My rush cane is tangling as I start to weave. Am I getting it too wet? It gets all twisted and I spend most of my time untangling rather than weaving..
Thank you for your advice.
Hi Elizabeth,
What kind of rush are you working with? Paper fibre or pre-twisted grass rush? If using pre-twisted it’s entirely possible you are getting the rush too wet and then besides tangling, it might also be untwisting and unraveling. Is that the case? And if you are using paper rush, then it’s not necessary to wet it much at all. As you are weaving the pattern, be sure that you are not twisting the coil in the opposite direction than what you are going. Make sure you twist the coil correctly as you go around each corner or post. Hope this helps!
How do I know how many feet of rush I will need to redo a chair?
Hi Lauren,
Each one of the companies listed on my Cane & Basket Supply Directory™ has tables that explain and show you how to calculate how much paper fibre rush you will need to do a chair seat.
But on average and depending on the size of rush you want to use, to do a 14″ x 14″ chair seat, you will need approximately 400-500 feet, which is about two pounds. Since the rush is sold by the 2 lb. coil, you would need one coil. However, just to be on the safe side you might want to order more than the minimum.
If you are still in doubt about how much you need after reading their order pages, just give the supplier a call and explain your project and give them the dimensions of the chair seat.
Hope your project goes well, and please tell the supplier that you contact, you saw their ad on WickerWoman.com!
Lauren,
Of course, every chair is different in size, so requires a different amount of rush to weave, but a general rule of thumb is that it takes two, 1-lb. coils of rush to do a 14″ wide chair seat. Another thing that figures into this is the size or gauge of rush you are using. The smaller diameter rush will require more feet and the larger gauge will take less footage. But no matter what, when you are ordering your rush, be sure to call the supplier and explain your situation if you can’t find the information on the tables they have in their website catalogs.
Question: I have a very old chair-maybe 1800’s?-that had a rush seat. But it also has the holes that I think are used for caning. I would like to take the chairs to someone who will know how I should redo the seats. Any suggestions? I live in Connecticut-
Hi Melinda,
Thanks for visiting my site! Sounds like you have an unusual chair there. Not too many, if any, that have both the holes drilled for caning and yet are woven in the rush seat pattern! Very odd indeed! To find a caning repair pro near you, just click on the Furniture Repair Directory tab at the top of every page. Then go to the Chair Caning category and click on the state you need to locate someone nearby to fix your furniture. Easy, peasy! https://www.wickerwoman.com/furniture-repair-directory
Cathryn,
Thank you for the very timely blog on rush weaving. It is a skill I want to add to my 7-step caning skills. Before I do a practice rush job (ha, ha) on my wife’s chair, I have to refinish and re-cane a bentwood rocker made out of bamboo. This thing is huge. It resembles Santa’s sleigh more than a chair. Bamboo is very interesting to refinish because it can’t take stain unless you sand off its natural waxy protective coating. Acrylic paint to the rescue! This adds color but retains the natural ‘grain’ of the bamboo.
Hi Chris,
Are you certain the big chair is made of bamboo and not rattan reed? They are very similar in outward appearance but the bamboo has a hollow core and is not all that strong when used in furniture. And it cracks and splits easily. However, the rattan reed is very strong with its a solid core. Thanks for the tips on staining the bark of the bamboo and/or rattan reed. You might find this article, which describes rattan reed and cane, helpful. https://www.wickerwoman.com/articles/cane-and-reed
I am getting two rush seats to replace on Monday. I have never worked this alternate way to weave a rail chair. I did see a tutorial from a craftsman chair seat using rush, where he went loose around the seat with the rush then tightened up after four wraps. But I do not remember if he used the gussets form to start off. I want to use this method on this up coming project. Very nice & beautiful.
Oh great Kathleen, trying out new rush starting techniques is always a good idea. Then once you find one that really works for your situation, you can use it all the time. Finding alternative ways to save the rails from all those tacks is always a plus.
Early on in my weaving career and after I got the rush weaving sequence down really well, I would always weave several complete rounds loosely and then go back and tighten up all the rows. It’s amazing how much time that saves you!
When teaching my students, I show them the technique but also warn them that it can be extremely confusing and they must master the weaving sequence first.