Learn How to Install Cane Webbing in chair seats, canoes, and other types of furniture for your DIY caning projects through this article by Cathryn Peters.
Chair cane webbing, invented in the 1870s, is one of three main types of chair caning. Unlike the other two types (hole cane and wide binding cane), this kind of chair caning material is woven on a machine loom.
The cane sheeting material is set into a groove around the perimeter of the seat and held in place by glue and a rattan spline.
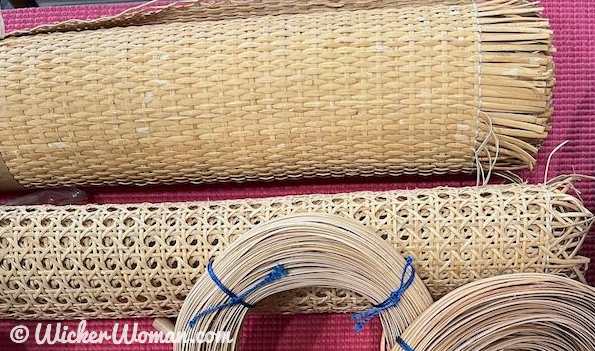
To make cane webbing, individual cane strips are first woven on a mechanized loom into “sheets”, “fabric”, or “panels.”
This fabric-like material is used on chairs that have a routed-out groove around the perimeter of the chair seat, no holes are drilled through the frame.
The cane webbing is tamped down into the groove and held in place with a rattan reed spline and glue.
Because the woven cane sheet is held in place with the reed spline, this design or pattern is also known and referred to as “spline cane.”
And since the cane is woven by a machine or loom in big sheets or panels, it is also referred to as “sheet cane,” “cane paneling,” “machine cane,” or “cane webbing.”
Installing cane webbing is much easier and less time-consuming than its counterpart, hole-to-hole hand caning.
In fact, the hardest part of this caning process is removing the old cane and glue from the groove. But on average, this caning project should take you only about one hour to complete from start to finish.
This post contains affiliate links. If you make a purchase, I will get a small commission at no additional cost to you. Thank you for your support.
Step-by-step Instructions for How-to Install Cane Webbing
Difficulty of task: Moderate
You can purchase materials, cane webbing, spline, caning wedges, and tools here: Cane & Basket Supplies Directory™
Things You’ll Need for this DIY Project:
• chair with a routed-out groove on the top side of the seat with a big hole in the center, not a series of drilled holes
• replacement sheet cane
• replacement rattan reed spline
• special spline removal chisels, 1/8″W, 1/4″W or 3/8″W
• hammer or mallet
• retractable utility knife with sharp blades, or SKIL 2354-12 iXO Power Screwdriver With Cutter Attachment![]()
• measuring tape
• basketmaking or regular scissors
• wooden wedges
• water soluble white glue or hide glue (do NOT use carpenter’s yellow glue or super glue)
• large sink, bathtub, or 4-inch diameter x 3-foot long PVC pipe with a cap on one end to soak cane in water
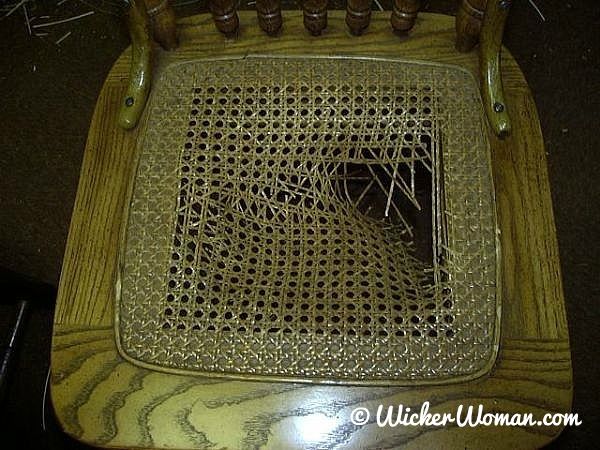
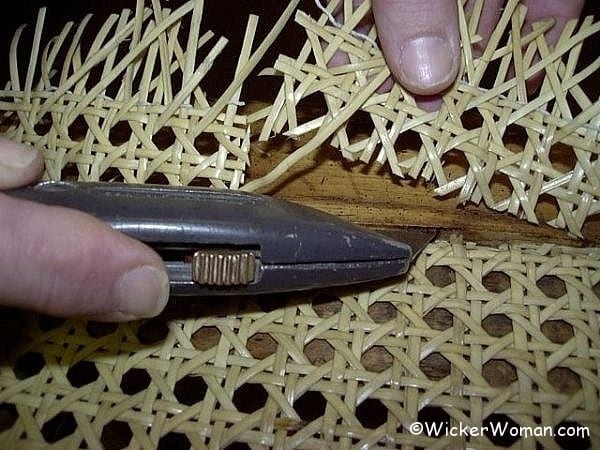
Step #1–Remove Old Cane Webbing, Spline and Glue from Groove.
First, cut out the sheet cane from the center of the chair using either scissors, a box cutter or a handy SKIL 2354-12 iXO Power Screwdriver With Cutter Attachment
Then remove cane webbing, spline and glue from chair seat groove using specially made chisels and a hammer.
Bevel the inside edge of seat opening using a rasp and sandpaper, so the sharp edge doesn’t cut the new cane. And be sure to keep a large piece of the old seat in case you need to match the pattern design or color.
RELATED READING: How-to Remove Spline Cane Webbing
Step #2–Measure and Order proper Size Cane Webbing and Spline
Measure cane webbing to be 2″ beyond the groove on all four sides. Also, measure the width of the groove itself and measure for length too, giving yourself about 2-4″ longer than needed for the spline.
There are several different patterns and sizes of cane webbing to suit your needs, but order the specific size spline to fit the groove in your chair.
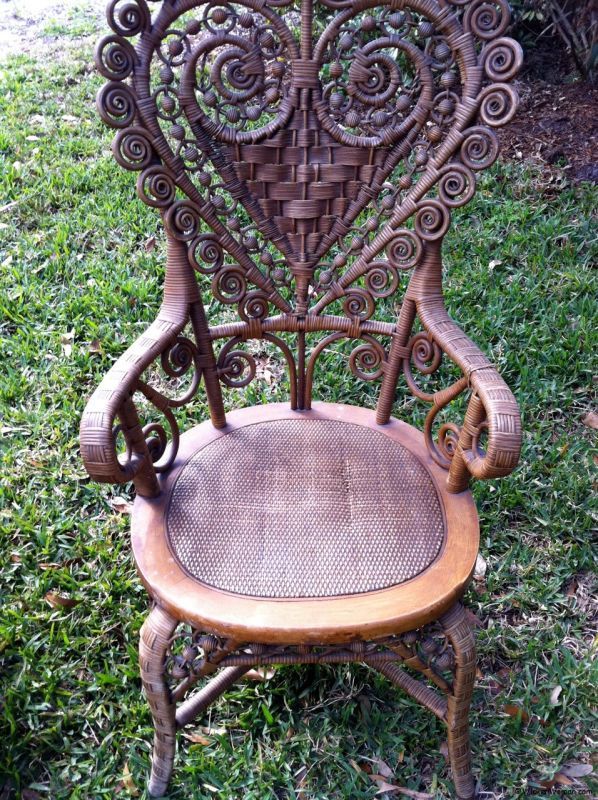
And if you are replacing the sheet cane in a fancy, Victorian-style wicker chair or rocker, use the “close-woven” sheet cane, not the open hexagon pattern.
Because the plain, dense, closed pattern will not compete with the fancy, curlicues, loops and other embellishments typical of the Victorian period style.
Step #3–Prepare the Machine Woven Cane Webbing and Spline
Soak the cane webbing or sheet cane in warm water for at least 30 minutes but up to as long as four hours until very supple. Roll up the cane and soak in your bathtub, sink, a wallpaper tray, or PVC pipe with caps on both ends.
Also, cut and measure the spline to be 2 inches longer than the groove. Spline only needs to soak for a short time, so put it in the water as you apply the webbing.
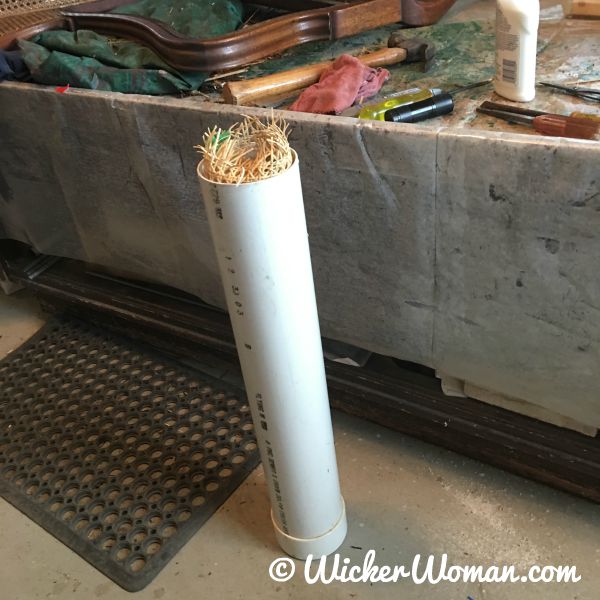
RELATED: Soaking sheet cane in PVC pipe
Step #4–Begin Spline Cane Installation Process
Drain or shake off excess water from the pre-soaked cane webbing. Position the sheet cane webbing over large seat hole opening so the pattern is centered and lined up both vertically and horizontally.
Make sure you have the shiny side up, which is the correct side.
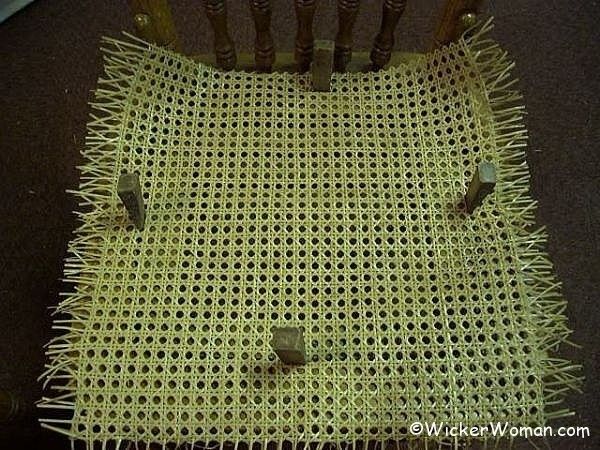
Then gently tamp webbing into the groove using the special wooden wedges, assisted with light taps from the hammer.
At this point, you might want to remove a few of the outer rows of caning from all four sides, which can ease the application of getting the cane into the groove.
Step #5–Cut Corners, Trim Excess from Cane Webbing Sheet
Press the cane into the groove at the back and front first, then press cane into the sides so the cane is centered properly.
Angle your wedges so they apply the most pressure to the outer side of the groove, not the inner, just to make sure your wedges don’t cut the cane.
Make small snips in the webbing at each corner to ease installation into the groove and then cut off excess webbing on sides to within 1″ to get out of your way. And if you are working on a round seat, cut at several intervals around outside of seat in the extra overhang.
Step #6–Secure and “Seat” Cane Into Groove
Continue to tamp webbing into all sides of the chair seat groove. Make sure that the webbing is completely down into the groove and that the sheet itself is pulled taught, but not tight across the large center hole.
The cane will shrink and tighten as it dries, so you don’t want to install it too tightly while it’s wet.
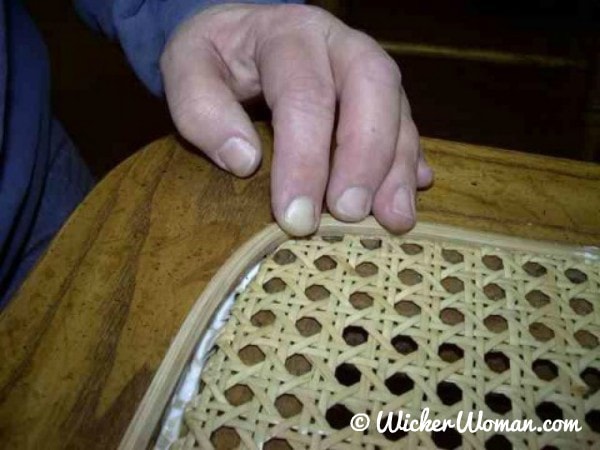
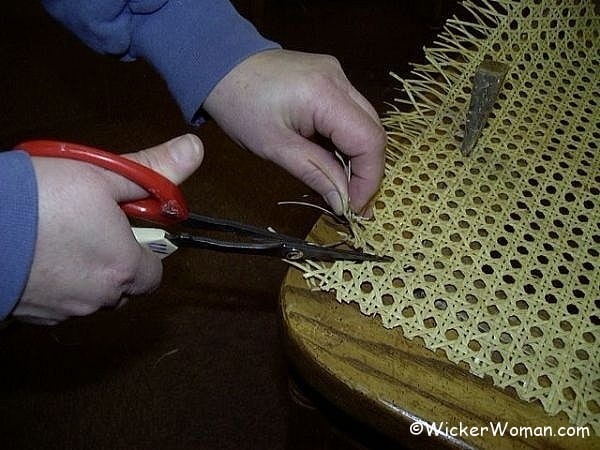
Step #7–Cut Excess Cane from Outer Edge of Groove
After the cane webbing is tamped down along the entire groove, then cut away excess cane webbing from the outer edge of the groove.
Use care to only cut on the outside of the groove, not the inside or you will ruin the sheet of cane!
When I was just starting out, I made this disastrous mistake! Thank goodness I was a quick learner!
Use a new sharp blade in your utility knife to make a clean cut within 1/4″ below seat surface. Again, going all the way around the groove and only cutting and trimming away the cane from the outside edge of the groove.
Watch your fingers too, it’s easy to slice your finger in the blink of an eye…Speaking from experience here, too.
Step #8–Apply Glue to Groove
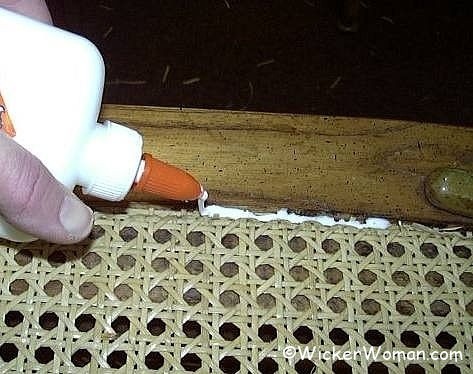
Apply a 1/8″ bead of animal hide glue, fish glue, or any white, water-soluble glue in the center of the groove, on top of the cane.
DO NOT USE CARPENTER’S YELLOW GLUE OR SUPER GLUE!
If you do use the wrong glue, the next caner that works on this chair will be swearing at you because the yellow glue does NOT come out easily. You ALWAYS need to use a glue that allows for easy spline cane removal.
Inserting Spline on Round Chair Seat
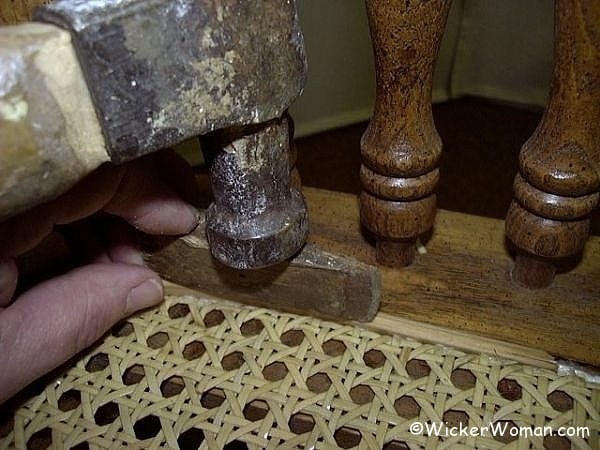
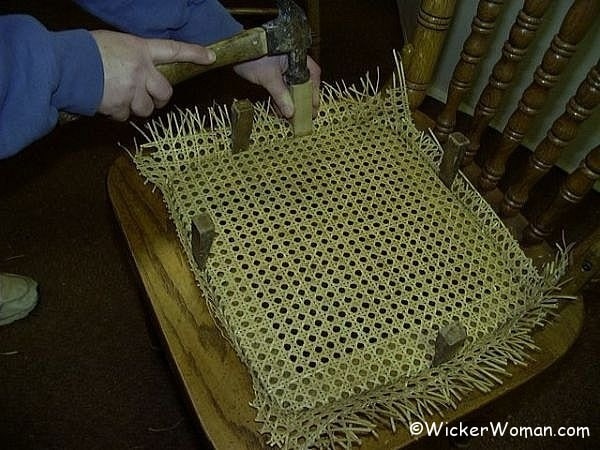
Shake off excess water from previously soaked reed spline and press into the groove. If you are working with a round seat, begin tamping and pressing in the spline from the center back.
I’ve found it easiest for me to work my way around from right to left in a counter-clockwise direction, probably because I’m right-handed. Try and see which way works best for you.
Press the spline into the groove using the side of a wooden wedge over the top of the spline and then tap lightly with a hammer to push into the groove.
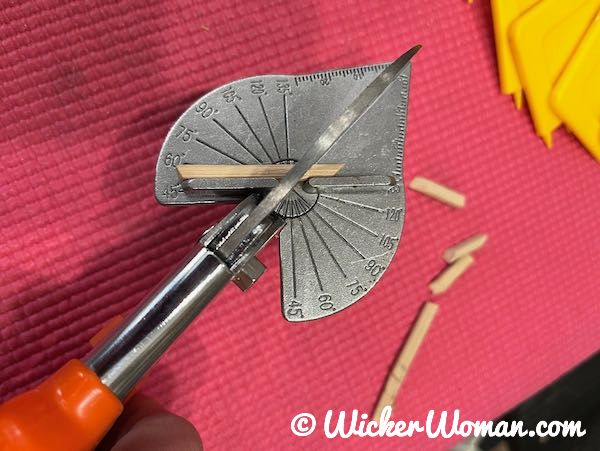
When you get around to the beginning end of the spline, measure both ends so they butt up closely together with no gap in between and mark those spots lightly with your fingernail or pencil. Or make a diagonal or slanted cut to match on each end, whichever looks best to you.
Place a small piece of wood, like a shim or use the flat side of a cane wedge under the spline to cut the ends.
Using your utility knife or basketmaking scissors, make either a diagonal cut on both ends as in the photograph or a blunt cut.
Press spline ends into the groove so they lay just a hair under the top of the seat surface like the rest of the spline.
Inserting Trapezoidal Cane Seat Spline
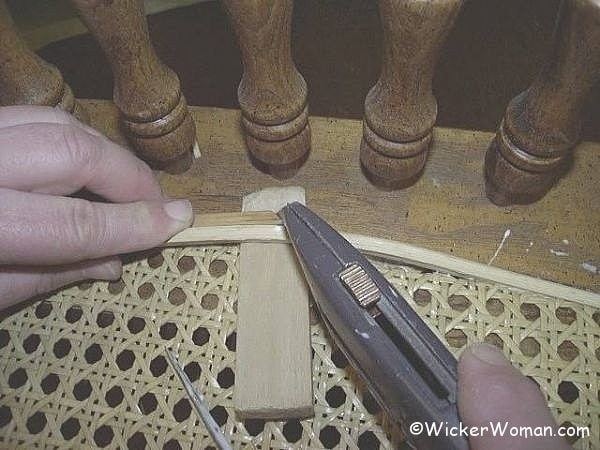
If you are working on a trapezoidal seat with four sides, you’ll need to measure and cut four portions of the spline.
Cut each piece at 45º angles on both ends using miter cutting shears to get perfect mitered corners at each of the four corners.
Then begin pressing in the individual pieces of spline one at a time, starting on either the front or back section first, then working your way around the frame.
Lay a wooden wedge on its side and lightly tap the spline on top with the hammer so the spline lies even with the seat surface or just slightly above.
Step #9–Clean Up and Let Sheet Cane Seat Dry
Clean up any excess water-soluble glue spills with a warm, wet rag, and your project is done!
If you are planning to stain the seat and spline, you’ll want to make sure you remove all the glue, because the stain won’t cover any glue.
Allow at least three days for the cane webbing, spline and the glue in the groove to dry thoroughly before using.
Congratulations on a DIY job well done. Enjoy!
Color Matching New Cane Seat to Old

If it’s necessary for you to color match a new chair cane webbing seat to the old, because it is part of a set, then you can use a gel stain or oil-based stain to get a fairly close match.
It’s advisable to let the cane darken naturally on its own, if at all possible, though, because the finish treatments seal the cane, making it more brittle.
The sheet cane can’t expand and contract with the variations of humidity as well as with a finish on it, as without.
And remember, too, the smooth, glossy side of the cane does not absorb stain well, nor does a clear finish coat stay well.
You will need first to rough up the new cane surface somewhat, using some sandpaper or steel wool (steel wool leaves messy fibers). Then, apply several light coats of stain until you get the desired result.
Let all coats dry first before applying another. Next, either brush on or spray a compatible final finish clear coat.
Don’t let anyone sit on the chair for 48 hours or more, until thoroughly dry.
###

We hope this “How-to Install Sheet Cane Webbing” article has been of help to you today. And thank you very much for your kind donation to help support us so we can provide more “How-to” articles for you!
Free Articles, Reports, Tip Sheets <–Back to
Next to –>How to Remove Cane Webbing